Jul 13, 2015
Here at Malwarebytes we have to deal with a huge amount of data generated by many different systems, malware research teams, telemetry, etc. That data can span for several Terabytes on a daily basis.
We have been using Amazon’s Elastic MapReduce (EMR) in many different occasions, but we are always looking to simplify our systems wherever we can. Before I start another flame-war about this topic and why we decided to create a MapReduce job that runs in a single machine as oppose to a cluster of EC2 instances, let me explain. When creating complex systems that leverages a cluster of machines, it comes with a lot of extra costs from DevOps, IT, deployments and many other things that now we need to mantain and keep up-to-date. There are cases where we would like to churn over tons of data, but we don’t need to be super fast, or leverage a huge complex infrastructure, therefore reducing lots of the costs and maintenance associated with it.
Other larger MapReduce jobs still runs within EMR, since we need more scalability and faster turn around times, and wouldn’t be appropriate to be executed in a single machine.
The Goal
We have a bunch of different anonymous telemetry systems that collects tons of data every second, and some of our executives wanted to have some data aggregated into CSV files that could be loaded into Excel and a couple of other analytics systems to generate custom Pivot Tables, so we can better understand some of the usage patterns and dig information from our telemetry, without us needing to write complicated reporting systems that would like change a lot.
Below is a stripped down version of our telemetry data so you guys can better understand what we were trying to accomplish.
{
    "Request": {
        "time": "2015-07-13 18:37:00",
        "processedTime": "2015-07-13 18:37:14",
        "uuid": "56ca2dbffc5f451285bade8e8ffef12c",
        "jobId": "ffffffc8f9af58389681e4a9749a4e6c",
        "Sender": "scanner",
        "Trigger": "update"
    },
    "App": {
        "Program": "app",
        "Build": "consumer",
        "License": "licensed",
        "Version": "2.1.8"
    },
    "Connection": {
        "Type": "broadband",
        "ISP": "Telecom Italia"
    },
    "Region": {
        "Continent": "EU",
        "Country": "IT",
        "Region": "08",
        "City": "Genoa"
    },
    "Client": {
        "OsVersion": "Windows 7 Service Pack 1",
        "Language": "it",
        "Architecture": "x64"
    }
}
As you can see, we have some simple telemetry data that our collector machines generate constantly from a few different systems. These JSON records gets aggregated and saved into thousands of different files into batches that can contain hundreds of thousands of lines each.
Each file contains some header comments with information from the collector and some metadata about this. Here is an example of one of these files that we need to process.
#  Type:				collector
#  Queue:				client
#  Processed At:		2015-07-13 18:37:14
#  Format:				json
#  Program Version:		2015-04-15
#  EC2 Instance Id:		i-d561a6fa
{ "Request": { "time": "2015-07-13 18:37:00", "processedTime": "2015-07-13 18:37:14", ...
{ "Request": { "time": "2015-07-13 18:37:00", "processedTime": "2015-07-13 18:37:14", ...
{ "Request": { "time": "2015-07-13 18:37:00", "processedTime": "2015-07-13 18:37:14", ...
{ "Request": { "time": "2015-07-13 18:37:00", "processedTime": "2015-07-13 18:37:14", ...
For this particular job requirement, we needed to aggregate counts of the unique combination that some of these fields have, in order to generate proper data for our Pivot Tables. Therefore this was a job for a MapReduce implementation, where we would aggregate the unique occurrences of each permutation of the data and then reduce the counts into the desired aggregation.
We wanted to ignore some fields in the JSON record, so we come up with a Telemetry structure that would map the fields that we would like to uniquely aggregate from. Here is what we came up with:
type Telemetry struct {
	Request struct {
    	Sender  string `json:"Sender,omitempty"`
    	Trigger string `json:"Trigger,omitempty"`
    } `json:"Request,omitempty"`

	App struct {
    	Program  string `json:"Program,omitempty"`
    	Build    string `json:"Build,omitempty"`
    	License  string `json:"License,omitempty"`
    	Version  string `json:"Version,omitempty"`
    } `json:"App,omitempty"`

	Connection struct {
    	Type string `json:"Type,omitempty"`
    } `json:"Connection,omitempty"`

	Region struct {
    	Continent string `json:"Continent,omitempty"`
    	Country   string `json:"Country,omitempty"`
    } `json:"Region,omitempty"`

	Client struct {
    	OsVersion    string `json:"OsVersion,omitempty"`
    	Language     string `json:"Language,omitempty"`
    	Architecture string `json:"Architecture,omitempty"`
    } `json:"Client,omitempty"`
}
So any permutation occurrence of any of these fields above, would generate a single line, with the correspondent occurrence count in the final output of our MapReduce.
Now that we have a better understanding on what were trying to accomplish, let’s look how we did implement the MapReduce for this.
Enumerating Files for the Job
In order to find files that we need to feed into our MapReduce engine, we would need to create a method to enumerate all the files in directory, and potentially sub-directories. For that, we will leverage the Walk() method inside the filepath package that is part of the standard library.
This method takes a walk function that has the following method signature:
type WalkFunc func(path string, info os.FileInfo, err error) error
We have implemented the enumeration function like this:
func enumerateFiles(dirname string) chan interface{} {
	output := make(chan interface{})
	go func() {
		filepath.Walk(dirname, func(path string, f os.FileInfo, err error) error {
			if !f.IsDir() {
				output <- path
			}
			return nil
		})
		close(output)
	}()
	return output
}
This function will first create a channel that will receive each file that is encountered by the Walk function, which will be used later in the our mapper function.
Generating Tasks for our Mapper
Another method that we need to write is one that will parse a single task file and enumerate all JSON records. Remember, we saved each JSON record as a separate individual line in our task file. We also need to account for the meta headers and ignore those.
func enumerateJSON(filename string) chan string {
	output := make(chan string)
	go func() {
		file, err := os.Open(filename)
		if err != nil {
			return
		}
		defer file.Close()
		reader := bufio.NewReader(file)
		for {
			line, err := reader.ReadString('\n')
			if err == io.EOF {
				break
			}

			// ignore any meta comments on top of JSON file
			if strings.HasPrefix(line, "#") == true {
				continue
			}

			// add each json line to our enumeration channel
			output <- line
		}
		close(output)
	}()
	return output
}
Defining our interface
For our MapReduce implementation we would need to define our collector type and a few function types that we will use later in the process. Here is what we came up with:
// MapperCollector is a channel that collects the output from mapper tasks
type MapperCollector chan chan interface{}

// MapperFunc is a function that performs the mapping part of the MapReduce job
type MapperFunc func(interface{}, chan interface{})

// ReducerFunc is a function that performs the reduce part of the MapReduce job
type ReducerFunc func(chan interface{}, chan interface{})
As you can see, we are leverage Go channels a lot here, and this will be the key to bridge all this together.
The Mapper
Onto the mapper function. The whole idea on this mapper implementation is to parse a single file and go over each JSON record that were enumerated, decoding the JSON content into our Telemetry structure and accumulate counts for each dimension (unique permutation of the data).
func mapper(filename interface{}, output chan interface{}) {
	results := map[Telemetry]int{}

    // start the enumeration of each JSON lines in the file
	for line := range enumerateJSON(filename.(string)) {

		// decode the telemetry JSON line
		dec := json.NewDecoder(strings.NewReader(line))
		var telemetry Telemetry

		// if line cannot be JSON decoded then skip to next one
		if err := dec.Decode(&telemetry); err == io.EOF {
			continue
		} else if err != nil {
			continue
		}

		// stores Telemetry structure in the mapper results dictionary
		previousCount, exists := results[telemetry]
		if !exists {
			results[telemetry] = 1
		} else {
			results[telemetry] = previousCount + 1
		}
	}

	output <- results
}
The trick on this mapper function lies into the way we define our Map to accumulate unique data. We defined a map in which the Key in our Telemetry structure as below:
results := map[Telemetry]int{}
Remember, in Go map keys may be of any type that is comparable. The language spec defines this precisely, but in short, comparable types are boolean, numeric, string, pointer, channel, and interface types, and structs or arrays that contain only those types. Notably absent from the list are slices, maps, and functions; these types cannot be compared using ==, and may not be used as map keys. It’s obvious that strings, ints, and other basic types should be available as map keys, but perhaps unexpected are struct keys. Struct can be used to key data by multiple dimensions.
The Reducer
Now for the reducer part of our job, we would simply need to aggregate the different Telemetry dimensions that were generated by all the different mappers that were ran in parallel.
func reducer(input chan interface{}, output chan interface{}) {
	results := map[Telemetry]int{}
	for matches := range input {
		for key, value := range matches.(map[Telemetry]int) {
			_, exists := results[key]
			if !exists {
				results[key] = value
			} else {
				results[key] = results[key] + value
			}
		}
	}
	output <- results
}
Dispatching Tasks
In this MapReduce implementation, were are leveraging channels for the different inputs and outputs from file enumeration, to Mappers and finally Reducers. We need to create some dispatcher functions to bridge all this together in invoke the next step in each case.
func mapperDispatcher(mapper MapperFunc, input chan interface{}, collector MapperCollector) {
	for item := range input {
		taskOutput := make(chan interface{})
		go mapper(item, taskOutput)
		collector <- taskOutput
	}
	close(collector)
}
The mapperDispatcher function is responsible to listen on the input channel that receives each filename to be processed and invoke a mapper for each file, pushing the output of the job into a MapperCollector, that would be used in the next step.
func reducerDispatcher(collector MapperCollector, reducerInput chan interface{}) {
	for output := range collector {
		reducerInput <- <-output
	}
	close(reducerInput)
}
The reducerDispatcher function is responsible to listen on the collector channel and push each item as the input for the Reducer task.
Putting all together in a MapReduce method
Now that we have all the pieces of the puzzle, it is time for us to put all together into a MapReduce function.
const (
	MaxWorkers = 10
)

func mapReduce(mapper MapperFunc, reducer ReducerFunc, input chan interface{}) interface{} {

	reducerInput := make(chan interface{})
	reducerOutput := make(chan interface{})
	mapperCollector := make(MapperCollector, MaxWorkers)

	go reducer(reducerInput, reducerOutput)
	go reducerDispatcher(mapperCollector, reducerInput)
	go mapperDispatcher(mapper, input, mapperCollector)

	return <-reducerOutput
}
As you can observe, we are creating all the required channels that would be the conduit and bridge of this entire operation.
First, we spawn a go routine that will be responsible for executing the Reducer task, listening for the input channels to operate on the data and outputing it’s task into the output channel when everything is done. Secondly, in order for the whole system to work, we need to start the dispatcher go routines that will bridge all this together invoking the next steps. The mapperDispatcher is responsible to invoke the mapper function that will trigger the whole MapReduce calculation.
We are limiting the number of concurrent mappers to 10 in this case, but we could control the amount of concurrency of over how many mappers are simultaneously opening the tasks files and aggregating data.
Finally, we have written our main() function like this:
import (
	"bufio"
	"encoding/csv"
	"encoding/json"
	"fmt"
	"io"
	"os"
	"path/filepath"
	"runtime"
	"strconv"
	"strings"
)

...

func main() {
	runtime.GOMAXPROCS(runtime.NumCPU())
	fmt.Println("Processing. Please wait....")

    // start the enumeration of files to be processed into a channel
	input := enumerateFiles(".")

    // this will start the map reduce work
	results := mapReduce(mapper, reducer, input)

	// open output file
	f, err := os.Create("telemetry.csv")
	if err != nil {
		panic(err)
	}
	defer f.Close()

	// make a write buffer
	writer := csv.NewWriter(f)

	for telemetry, value := range results.(map[Telemetry]int) {

		var record []string

		record = append(record, telemetry.Request.Sender)
		record = append(record, telemetry.Request.Trigger)
		record = append(record, telemetry.App.Program)
		record = append(record, telemetry.App.Build)
		record = append(record, telemetry.App.License)
		record = append(record, telemetry.App.Version)
		record = append(record, telemetry.Connection.Type)
		record = append(record, telemetry.Region.Continent)
		record = append(record, telemetry.Region.Country)
		record = append(record, telemetry.Client.OsVersion)
		record = append(record, telemetry.Client.Language)
		record = append(record, telemetry.Client.Architecture)

        // The last field of the CSV line is the aggregate count for each occurrence
		record = append(record, strconv.Itoa(value))

		writer.Write(record)
	}

	writer.Flush()

	fmt.Println("Done!")
}
The first step is to kick off the enumerateFiles(...) function to start enumerating files to be processed that will be pushed into a input channel. Then we invoke the mapReduce(...) method that will perform the entire Job returning an array of the end results.
As a final step, we write the entire MapReduce results into a CSV file, printing each Telemetry dimension and it’s respective aggregate count in each line.
Conclusion
Sometimes you don’t need overly complex infrastructures or systems to do a job well. In this case, we were running these exact same aggregations over close to 20 EMR instances that would take a few minutes to execute the entire MapReduce job over hundreds of Gigabytes of data each day.
When we decided to take a look at this problem again, we rewrote this task using Go, and we now simply run this on a single 8-core machine and the whole daily execution takes about 10 minutes. We cut a lot of the costs associated with maintaining and running these EMR systems and we just schedule this Go app to run once a day over our daily dataset.
You can find the entire code here:
https://gist.github.com/mcastilho/e051898d129b44e2f502
Jul 12, 2015
The Go Language growth has been phenomenal in the last few years, and is attracting language converts from all walks of life. There has been a lot articles recently about companies switching from Ruby, and experiencing the new world of Go and it’s parallel and concurrent approach to problems.
In the last 10 years, Ruby on Rails has allowed many developers and startups to quickly develop powerful systems, most of the time without needing to worry on how the inner things work, or worry about thread-safety and concurrency. It is very rare for a RoR application to create threads and run things in parallel. The whole hosting infrastructure and framework stack uses a different approach, by parallelizing it via multiple processes. It has only been in the last few years that multithreaded rack servers like Puma has surged in popularity, but even that brought a lot of issues in the beggining with third-party gems and other code that weren’t designed to be thread safe.
Now with a lot of new developers embarking into the Go Language boat, we need to carefully look at our code and see how it will behave, it needs to be designed in a thread-safe way.
The Common Mistake
Recently, I have seen this kind of mistake more and more in github repositories. Singleton implementations that doesn’t have any consideration for thread-safety. Below is the most common example of this mistake.
package singleton

type singleton struct {
}

var instance *singleton

func GetInstance() *singleton {
	if instance == nil {
		instance = &singleton{}   // <--- NOT THREAD SAFE
	}
	return instance
}
In the above scenario, multiple go routines could evaluate the first check and they would all create an instance of the singleton type and override each other. There is no guarantee which instance it will be returned here, and other further operations on the instance can be come inconsistent with the expectations by the developer.
The reason this is bad is that if references to the singleton instance are being held around through the code, there could be potentially multiple instances of the type with different states, generating potential different code behaviours. It also becomes a real nightmare during debugging and becomes really hard to spot the the bug, since that at debugging time nothing really appears to be wrong due to the run-time pauses minimizing the potential of a non-thread-safe execution, easily hiding the problem from the developer.
The Aggressive Locking
I have also seen this poor solution to the thread-safety problem. Indeed this solves the thread-safety issue, but creates other potential serious problems. It introduces a threading contention by perform aggressive locking of the entire method.
var mu Sync.Mutex

func GetInstance() *singleton {
    mu.Lock()                    // <--- Unnecessary locking if instance already created
    defer mu.Unlock()

    if instance == nil {
        instance = &singleton{}
    }
    return instance
}
In the code above, we can see that we solve the thread-safety issue by introducing the Sync.Mutex and acquiring the Lock before creating the singleton instance. The problem is that here we are performing excessive locking even when we wouldn’t be required to do so, in the case the instance has been already created and we should simply have returned the cached singleton instance. On a highly concurrent code base, this can generate a bottle-neck since only one go routine could get the singleton instance at a time.
So, this is not the best approach. We have to look at other solutions.
Check-Lock-Check Pattern
In C++ and other languages, the best and safest way to ensure minimal locking and still be thread-safe is to utilize the well known pattern called Check-Lock-Check, when acquiring locks. The pseudo-code for the pattern is something like this.
if check() {
    lock() {
        if check() {
            // perform your lock-safe code here
        }
    }
}
The idea behind this pattern is that you would want to check first, to minimize any aggressive locking, since an IF statement is less expensive than the locking. Secondly we would want to wait and acquire the exclusive lock so only one execution is inside that block at a single time. But butween the first check and the acquisition of the exclusive lock there could have been another thread that did acquire the lock, therefore we would need to check again inside the lock to avoid replacing the instance with another one.
Over the years, the people that has worked with me knows this well, that I have been very strict with my engineering teams during code-reviews about this pattern and thread-safety mentality.
If we apply this pattern to our GetInstance() method we would have something as follow:
func GetInstance() *singleton {
    if instance == nil {     // <-- Not yet perfect. since it's not fully atomic
        mu.Lock()
        defer mu.Unlock()

        if instance == nil {
            instance = &singleton{}
        }
    }
    return instance
}
This is a better approach, but still is not perfect. Since due to compiler optimizations there is not an atomic check on the instance store state. With all the technical considerations this is still not perfect. But it is much better than the initial approach.
But using the sync/atomic package, we can atomically load and set a flag that will indicate if we have initialized or not our instance.
import "sync"
import "sync/atomic"

var initialized uint32
...

func GetInstance() *singleton {

    if atomic.LoadUInt32(&initialized) == 1 {
		return instance
	}

    mu.Lock()
    defer mu.Unlock()

    if initialized == 0 {
         instance = &singleton{}
         atomic.StoreUint32(&initialized, 1)
    }

    return instance
}
But… I believe we could do better by looking into how the Go Language and standard library implements go routines synchronization.
An Idiomatic Singleton Approach in Go
We want to implement this Singleton pattern utilizing the Go idiomatic way of doing things. So we have to look at the excellent standard library packaged called sync. We can find the type Once. This object will perform an action exactly once and no more. Below you can find the source code from the Go standard library.
// Once is an object that will perform exactly one action.
type Once struct {
	m    Mutex
	done uint32
}

// Do calls the function f if and only if Do is being called for the
// first time for this instance of Once. In other words, given
// 	var once Once
// if once.Do(f) is called multiple times, only the first call will invoke f,
// even if f has a different value in each invocation.  A new instance of
// Once is required for each function to execute.
//
// Do is intended for initialization that must be run exactly once.  Since f
// is niladic, it may be necessary to use a function literal to capture the
// arguments to a function to be invoked by Do:
// 	config.once.Do(func() { config.init(filename) })
//
// Because no call to Do returns until the one call to f returns, if f causes
// Do to be called, it will deadlock.
//
// If f panics, Do considers it to have returned; future calls of Do return
// without calling f.
//
func (o *Once) Do(f func()) {
	if atomic.LoadUint32(&o.done) == 1 { // <-- Check
		return
	}
	// Slow-path.
	o.m.Lock()                           // <-- Lock
	defer o.m.Unlock()
	if o.done == 0 {                     // <-- Check
		defer atomic.StoreUint32(&o.done, 1)
		f()
	}
}
What this means is the we can leverage the awesome Go sync package to invoke a method exactly only once. Therefore, we can invoke the once.Do() method like this:
once.Do(func() {
    // perform safe initialization here
})
Below you can find the full code of this singleton implementation that utilizes the sync.Once type to syncronize access to the GetInstance() and ensures that our type only gets initialized exactly once.
package singleton

import (
    "sync"
)

type singleton struct {
}

var instance *singleton
var once sync.Once

func GetInstance() *singleton {
    once.Do(func() {
        instance = &singleton{}
    })
    return instance
}
Therefore, using the sync.Once package is the preferred way of implementing this safely, in similar way that Objective-C and Swift (Cocoa) implements the dispatch_once metod to perform similar initialization.
Conclusion
When it comes to concurrent and parallel code, a lot more careful examination of your code is needed. Always have your team members perform code-reviews, since things like this is easy to have an oversight.
All the new developers that are switching to Go needs to really understand how thread-safety works to better improve their code. Even though the Go language itself does a lot of the heavy-lifting by allowing you to design concurrent code with minimal knowledge of concurrency. There are several cases where the language doesn’t help you, and you still need to apply best practices in developing your code.
Jul 7, 2015
After years of using Integrated Development Environments (IDE) during my Windows progamming days, such as Visual Basic IDE, Borland Delphi IDE, Visual C++ and more recent Visual Studio, I have ditched all of those when I switched to Mac OS X about 10 years ago.
My initial transition in the Mac programming world was using excellent Textmate editor at the time. A fast coding editor with great highlight syntax, extension modules and code snippets that made me feel productive again. After the decline of TextMate several years ago, since the application wasn’t getting software updates, a lot of people ended up switching to Sublime Text editor and the traditional VIM editor.
I have tried Atom when it first came out a while back, but it wasn’t ready for prime time. When they officially launched version 1.0 a few days ago, I have decided to give it another try. And I am really happy that I did.
https://atom.io/
Installing a Theme
You are going to spend most of your day looking at code and staring at this environment, so you should always find a theme that pleases your eyes and that have a natural color balance. I believe this is very personal, and you should find one that you like the most.
What I have been using is the combination of the One Dark UI Theme and the Monokai-Seti Syntax theme. I really enjoy the aesthetics of this duo.
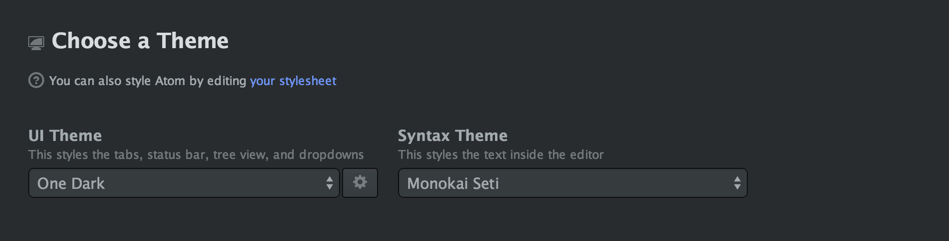
Here is how it looks like on my environment:
monokai-seti
Installing a Programmers Font
One of the first things I wanted to do when opening Atom the first time, was to install and use my preferred programming font. I have been using the free “Inconsolata” font for a while.
You can find and download it here: http://www.levien.com/type/myfonts/inconsolata.html
You can easily change the font being used in the editor view through the standard editor settings.
Installing Languages
The standard packages that come with Atom cover most of your language needs. There are 2 packages that I have missed for my Go development, one is the support for Dockerfile syntax and Google Protobuf syntax, which both I use in a lot of my projects.
Installing Packages
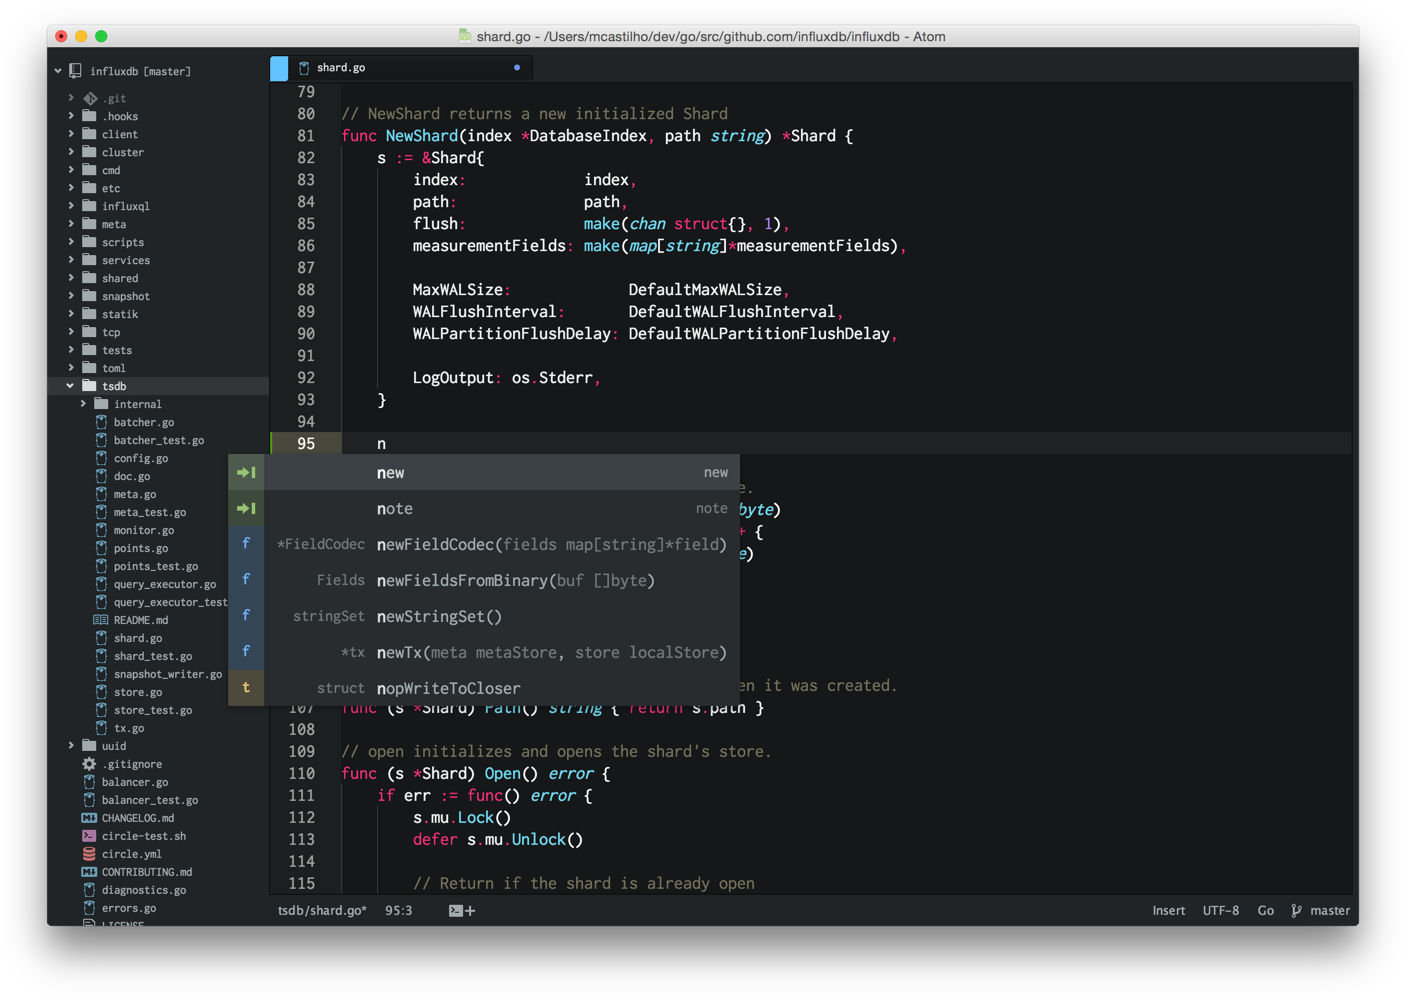
go-plus
This package provides almost all of Go Language support in Atom for tools, build flows, linters, vet and coverage tools. It also contains many code snippets and other features.
Make sure you have all the golang tools installed, by using the following command from your shell:
go get -u golang.org/x/tools/cmd/...
go get -u github.com/golang/lint/golint
There are many features in go-plus. But my favorite while developing my Go code is that I have instant feedback on my syntax and build errors. As soon as I save a file, go-plus runs in the background a miriad of tools like go vet, go oracle, go build, etc, and displays in the bottom of your editor any errors and warnings you may have. This is totally awesome and speeds up your dev cycles dramatically.
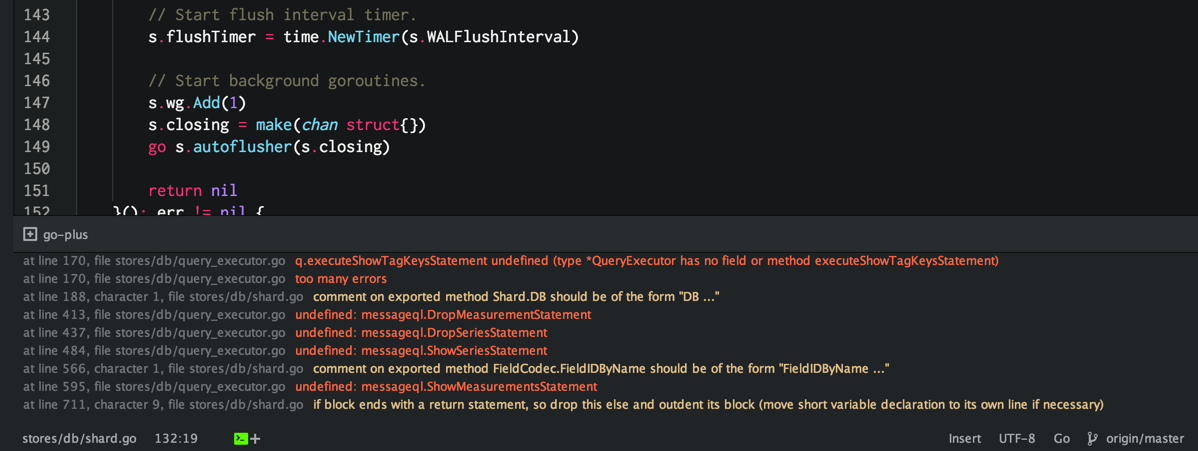
It has also the ability to display on the editor gutter an indication of any build errors on that line, so you can easily spot which lines has an errors. Errors are displayed in red and warnings in yellowish.
go-rename
This package provides intelligent variable, methods and struct safe renaming by plugging into the Go rename tool. You can easily initiate a rename refactoring dialog by pressing ALT-R when you have an identifier selected.
Making it a little more similar to VIM
You may ask “Why not using VIM instead?”. The fact is that I have for more than a year, but I wanted to try out Atom, and I am really enjoying the experience, specially since I have all the VIM commands I have been using here in the Atom Editor.
The fact is that I am a basic VIM user, and most of the benefits for me is about caret navigation, insertion, text replacements, line deletions, line jumps, etc. Once you have installed the nice vim-mode package by the Atom team, you have all that, and lot more commands that I haven’t really used yet from VIM.
Mapping a few commands in the Keymap File
'atom-text-editor:not(mini).autocomplete-active':
  'ctrl-p': 'core:move-up'
  'ctrl-n': 'core:move-down'

'.vim-mode.command-mode:not(.mini)':
  'ctrl-f': 'core:page-down'
  '/': 'find-and-replace:show'
One VIM module I miss is Easy-Motion. There was one package for Atom but is currently not compatible with Atom 1.0. I am sure somebody will update or create a version soon.
Customizing your TreeView
file-icons
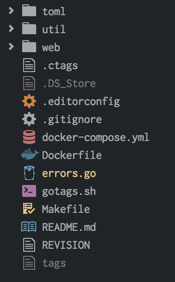
At first, I thought this package would make my treeview way too colorful with a bunch of different colored icons for my filetypes in the TreeView, Tabs, and Fuzzy finder dialogs. But I decided to try it out and now I think this is really cool. In fact, it does help me find, at a quick glance, the file I am looking for specially in the root of my project. There are several settings in the package to control whether to show color-less icons and/or to only colorize icons if a file has been modified.
Below you can see how your TreeView would look like once you have this packaged installed. Give it a try, I am sure you will like it.
Applying some CSS modifications
The default line height for the TreeView is usually a little bit too tall, so I wanted to reduce the padding between the lines. Another modification was to use the same fixed font I use in my editor to keep the style consistent. I usually use the Inconsolata font.
// style the background color of the tree view
.tree-view {
    font-family: "Inconsolata";
    font-size: 12px;
}

.list-group li:not(.list-nested-item),
.list-tree li:not(.list-nested-item),
.list-group li.list-nested-item > .list-item,
.list-tree li.list-nested-item > .list-item {
    line-height:18px;
}

.list-group .selected:before,
.list-tree .selected:before {
    height:18px;
}

.list-tree.has-collapsable-children .list-nested-item > .list-tree > li,
.list-tree.has-collapsable-children .list-nested-item > .list-group > li {
    padding-left:12px;
}
Code Snippets
Most modern programming editors and IDEs comes with code-completion for common keywords and code structures based on the language of choice. It usually contains most of the common ones, but it is far from complete. There lots of rooms for improvements here in the standard stock packages, specially the support for Go via the standard Atom Go langauge package and go-plus package.
But Atom allows you to create your own code snippets repository in the snippets.cson file. Open the Snippets file from the Atom menu, and you can start creating your own snippets library.
You will have to create your entries under a .source.go scope, so your snippets will only be suggested by the auto-completion feature when you are editing Go files.
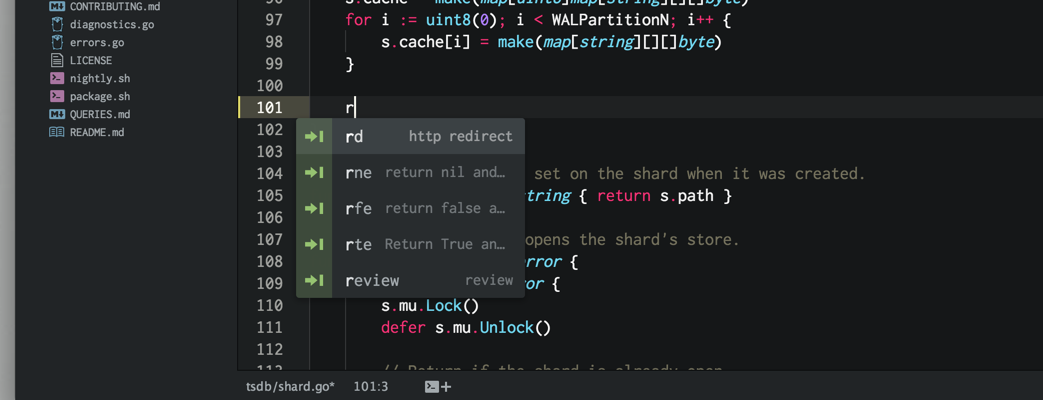
Here are a few that I have added recently:
'.source.go':
    'return nil and error':
      'prefix': 'rne'
      'body': 'return nil, err'

    'return false and error':
      'prefix': 'rfe'
      'body': 'return false, err'

    'Return True and Nil':
      'prefix': 'rte'
      'body': 'return true, nil'

    'Import logrus':
      'prefix': 'logrus'
      'body': 'log "github.com/Sirupsen/logrus"'
Once you have defined your snippets, they immediately show up in your auto-completion suggestions. I love this feature, and I try to add common snippets of my Go code to really speed up typing.
Dash
Dash is a fantastic commercial application for Mac OS X that gives you instant offline access to 150+ API documentation sets from many languages and frameworks. I have been using it for a few years with Ruby development and now with Go.
You can find more about it here: https://kapeli.com/dash
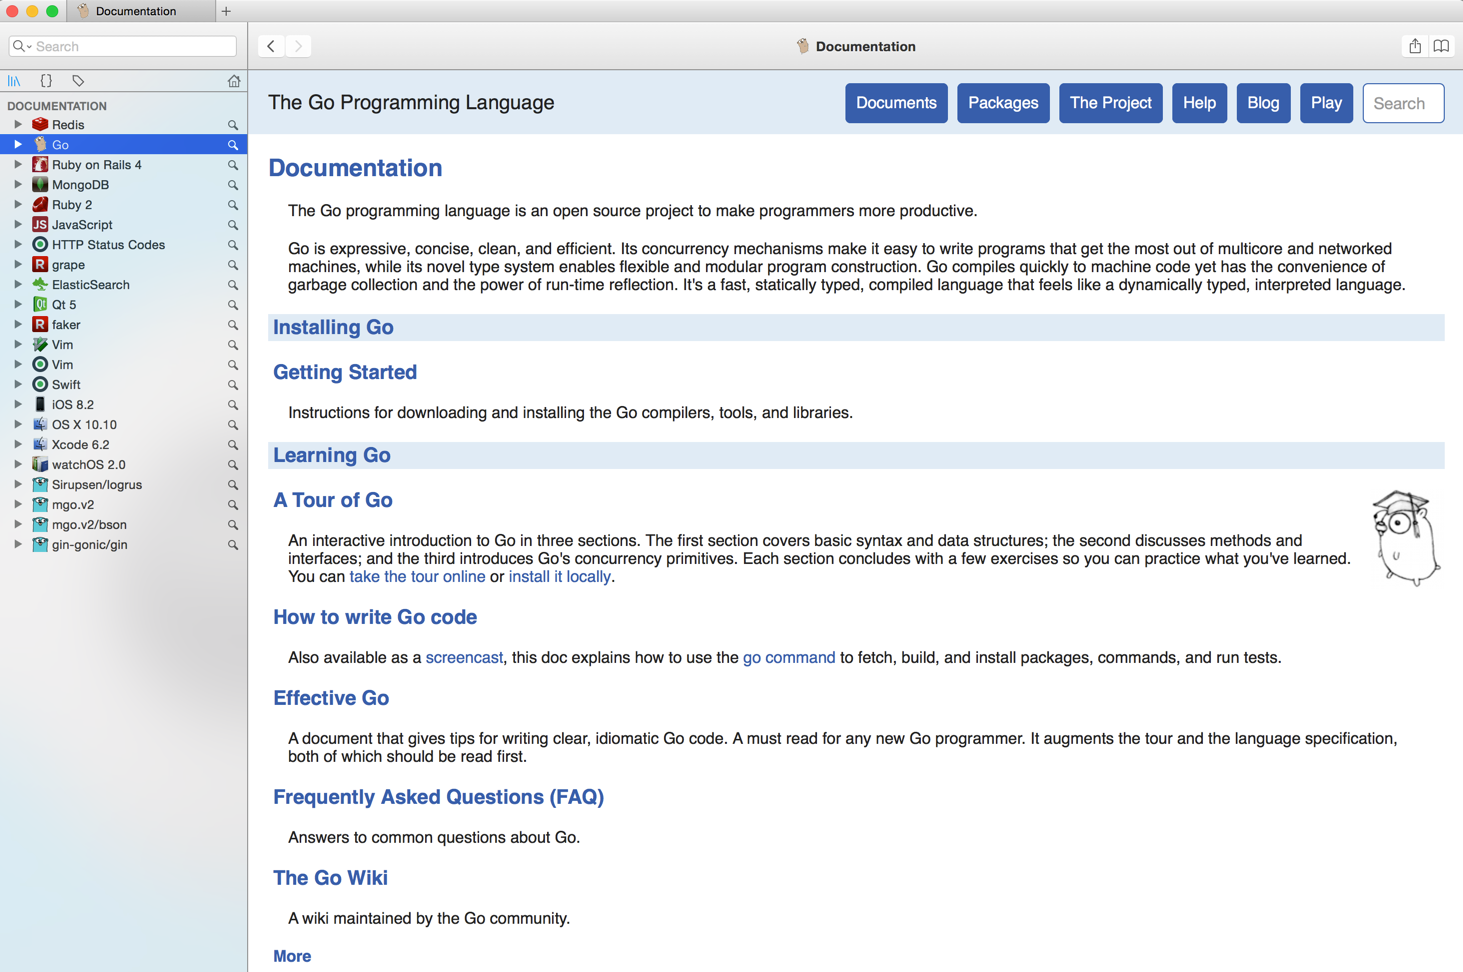
There is an Atom package that integrates your editor shortcuts via CTRL-H once you have a text selected and opens up directly in the Dash application. Pretty hand when you want to quickly jumpt to a method declaration documentation.
dash
https://atom.io/packages/dash
Styling your Editor
One of the biggest advantages of Atom editor compared to other native editors, is its ability to completely customize the interface using Cascade Stylesheets (CSS). Almost all aspects of the editor can be tweaked and improved if it doesn’t appeal you.
Changing Symbol View appearance
One of the areas that really bothered me was the stock Symbols-View dialog, the lines were too tall and could barely fit many rows in the lookup window. I liked the way Sublime implemented and I decided to customize it to resembles more of what Sublime had.
.symbols-view {
  &.select-list ol.list-group li .primary-line,
  &.select-list ol.list-group li .secondary-line {

    font-family: Inconsolata;
    font-size: 14px;

    // let lines wrap
    text-overflow: initial;
    white-space: initial;
    overflow: initial;

    // reduce line-height
    line-height: 1.0em;
    padding-top: .1em;
    padding-bottom: .0em;

    // make sure wrapped lines get padding
    // padding-left: 21px;
    &.icon:before {
      margin-left: -21px;
    }

    .character-match {
        color: rgb(200, 200, 10) !important;
    }
  }
}

.symbols-view {
  &.select-list ol.list-group li .secondary-line {
      float: right;
      margin-top: -12px;
      padding-top: 0em;
      padding-bottom: 0em;
      font-size: 12px;
      color: rgba(200, 200, 10, 0.8) !important;
  }
}
The end result is a much slicker Symbols-View. When you press Command+R the symbols view appear, and you can see that line-heights are shorter and the line numbers aligned to the right of the view.
Styling Line Selection
There is an interesting package called Hightlight-Line:
https://atom.io/packages/highlight-line
This package allows customization of the line selection styles. In my case, I have added a dashed yellow border to the bottom and top my selection. I like the way it looks and helps me determine the range of selection specially at the last line where it could be a partial selection.
You can replace ‘solid’, with ‘dashed’ or ‘dotted’ on the CSS selector depending of what you have
set in the package settings page.
atom-text-editor::shadow {

    .line.highlight-line {
        background: rgba(255, 255, 255, 0.05) !important;
    }

    .line.highlight-line-multi-line-dashed-bottom {
        border-bottom-color: yellow !important;
    }

    .line.highlight-line-multi-line-dashed-top {
        border-top-color: yellow !important;
    }
}
Auto-completion is a very important feature when programming, and is usually very intrusive to the developers. So the suggestions it should make needs to be very good or it will annoy you really quick. Missing suggestions is one of the most frustating things when it comes to auto-completion functionality.
When you know a structure, interface or method name you want to use the Auto-completion so you can type fast and jump to the next work. When you are constantly not finding the items that should be there your developer happiness level suffers tremendously.
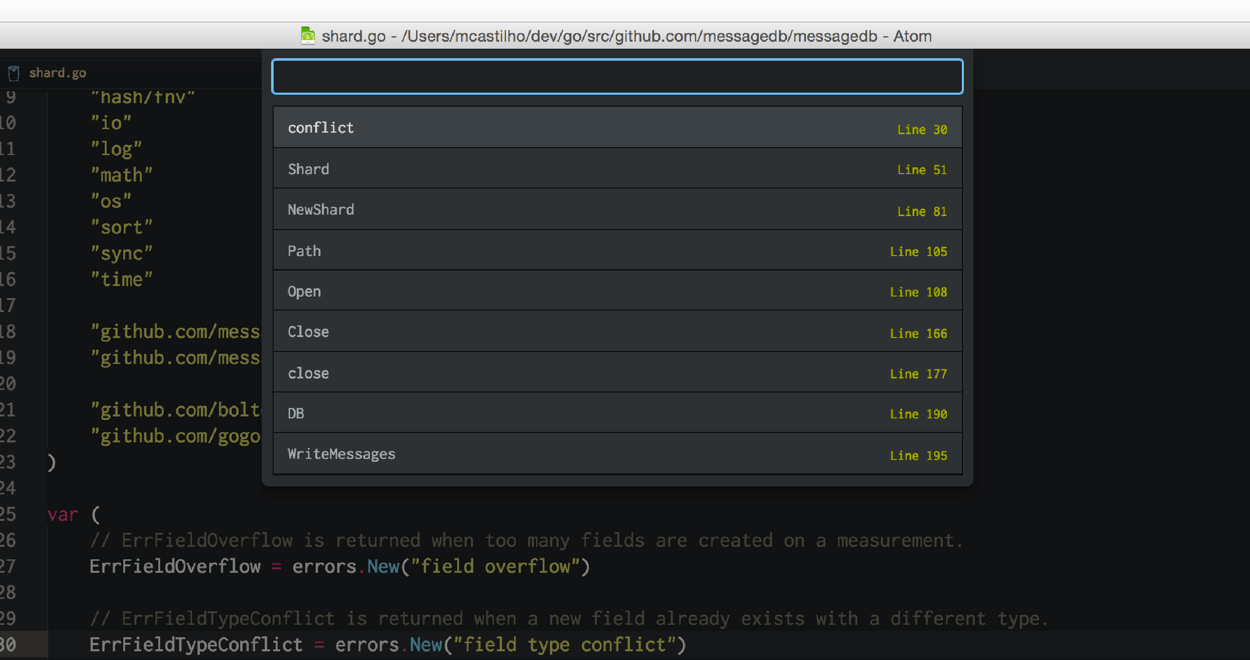
There is an awesome tool called gotags that is ctags compatible generator for Go Language. It utilizes the power of AST and Parsing classes in the Go standard library to really understand and capture all the structure, interfaces, variables and methods names. It generates a much better ctags list than the standard ctags standard tools.
You can install it by running the following commands:
go get -u github.com/jstemmer/gotags
And then generate tags simply by invoking it like this from the root of your source code:
gotags -tag-relative=true -R=true -sort=true -f="tags" -fields=+l .
This will generate a new tags file in the root of your code, and Atom auto-completion will be much more smarter about your Go code.
Conclusion
Whether you like Sublime Text or have been a VIM fanatic, you should give Atom a shot now that they have reached version 1.0 a couple of weeks ago.
Especially since it is an open-source project backed by Github.com, there is a lot of activity and the community is growing incredibly fast.
Give it a try !!
Jul 7, 2015
We do a lot of file hash calculations at work, where we commonly go through millions of files a day using a diverse number of hashing algorithms. The standard Go library is amazing, and it has many structures and methods to do all that kind of stuff. Sometimes you just have to look for some new methods that opens up the possibilities even more.
The Goal
The initial goal of this code was to calculate multiple hashes on a single file residing on disk, and only perform a single read, instead of reading the whole contents of the file multiple times for each hash algorithm.
The idea was to return an structure with the results of the desired hash:
type HashInfo struct {
	Md5    string `json:"md5"`
	Sha1   string `json:"sha1"`
	Sha256 string `json:"sha256"`
	Sha512 string `json:"sha512"`
}
Looking into the standard library
As park of the Go standard library io package, we can find this function below:
func MultiWriter(writers ...Writer) Writer
Here is a snippet of the source code implementation of this function in the io package:
type multiWriter struct {
    writers []Writer
}

func (t *multiWriter) Write(p []byte) (n int, err error) {
	for _, w := range t.writers {
		n, err = w.Write(p)
		if err != nil {
			return
		}
		if n != len(p) {
			err = ErrShortWrite
			return
		}
	}
	return len(p), nil
}

func MultiWriter(writers ...Writer) Writer {
	w := make([]Writer, len(writers))
	copy(w, writers)
	return &multiWriter{w}
}
The MultiWriter method creates a writer that duplicates its writes to all the provided writers, similar to the Unix tee command.
This is interesting because since all of hash functions in standard library adheres to this interface:
type Hash interface {
        // Write (via the embedded io.Writer interface) adds more data to the running hash.
        // It never returns an error.
        io.Writer

        // Sum appends the current hash to b and returns the resulting slice.
        // It does not change the underlying hash state.
        Sum(b []byte) []byte

        // Reset resets the Hash to its initial state.
        Reset()

        // Size returns the number of bytes Sum will return.
        Size() int

        // BlockSize returns the hash's underlying block size.
        // The Write method must be able to accept any amount
        // of data, but it may operate more efficiently if all writes
        // are a multiple of the block size.
        BlockSize() int
}
The Approach
Therefore, we could create a MultiWriter that is going to write to multiple Hash implementations only performing a single read pass through the original file, as you can see in the code below:
func CalculateBasicHashes(rd io.Reader) HashInfo {

	md5 := md5.New()
	sha1 := sha1.New()
	sha256 := sha256.New()
	sha512 := sha512.New()

	// For optimum speed, Getpagesize returns the underlying system's memory page size.
	pagesize := os.Getpagesize()

	// wraps the Reader object into a new buffered reader to read the files in chunks
	// and buffering them for performance.
	reader := bufio.NewReaderSize(rd, pagesize)

	// creates a multiplexer Writer object that will duplicate all write
	// operations when copying data from source into all different hashing algorithms
	// at the same time
	multiWriter := io.MultiWriter(md5, sha1, sha256, sha512)

	// Using a buffered reader, this will write to the writer multiplexer
	// so we only traverse through the file once, and can calculate all hashes
	// in a single byte buffered scan pass.
	//
	_, err := io.Copy(multiWriter, reader)
	if err != nil {
		panic(err.Error())
	}

	var info HashInfo

	info.Md5 = hex.EncodeToString(md5.Sum(nil))
	info.Sha1 = hex.EncodeToString(sha1.Sum(nil))
	info.Sha256 = hex.EncodeToString(sha256.Sum(nil))
	info.Sha512 = hex.EncodeToString(sha512.Sum(nil))

	return info
}
Here is a sample of command line utility to calculate the multiple hashes.
package main

import (
	"bufio"
	"crypto/md5"
	"crypto/sha1"
	"crypto/sha256"
	"crypto/sha512"
	"encoding/hex"
	"fmt"
	"io"
	"log"
	"os"
	"runtime"
)

func main() {
	args := os.Args[1:]

	var filename string
	filename = args[0]

    // open an io.Reader from the file we would like to calculate hashes
	f, err := os.OpenFile(filename, os.O_RDONLY, 0)
	if err != nil {
		log.Fatalln("Cannot open file: %s", filename)
	}
	defer f.Close()

	info := CalculateBasicHashes(f)

	fmt.Println("md5    :", info.Md5)
	fmt.Println("sha1   :", info.Sha1)
	fmt.Println("sha256 :", info.Sha256)
	fmt.Println("sha512 :", info.Sha512)
	fmt.Println()
}
Of course that in a real-world scenario we wouldn’t be invoking the command line utility for every single file. This was just a simple example on how to write a little command line utility to demonstrate this approach. The real benefit is when we are traversing through millions of files and performing hash calculations using a single read pass through the contents file. This has a significant impact on our ability to fast go through our file repositories.
There are so many interesting functions and interfaces in the standard library that everyone should take look at the source code once in a while.
Jul 6, 2015
Here at Malwarebytes we are experiencing phenomenal growth, and since I have joined the company over 1 year ago in the Silicon Valley, one my main responsibilities has been to architect and develop several systems to power a fast-growing security company and all the needed infrastructure to support a product that is used by millions of people every single day. I have worked in the anti-virus and anti-malware industry for over 12 years in a few different companies, and I knew how complex these systems could end up being due to the massive amount of data we handle daily.
What is interesting is that for the last 9 years or so, all the web backend development that I have been involved in has been mostly done in Ruby on Rails. Don’t take me wrong, I love Ruby on Rails and I believe it’s an amazing environment, but after a while you start thinking and designing systems in the ruby way, and you forget how efficient and simple your software architecture could have been if you could leverage multi-threading, parallelization, fast executions and small memory overhead. For many years, I was a C/C++, Delphi and C# developer, and I just started realizing how less complex things could be with the right tool for the job.
As a Principal Architect, I am not very big on the language and framework wars that the interwebs are always fighting about. I believe efficiency, productivity and code maintainability relies mostly on how simple you can architect your solution.
The Problem
While working on a piece of our anonymous telemetry and analytics system, our goal was to be able to handle a large amount of POST requests from millions of endpoints. The web handler would receive a JSON document that may contain a collection of many payloads that needed to be written to Amazon S3, in order for our map-reduce systems to later operate on this data.
Traditionally we would look into creating a worker-tier architecture, utilizing things such as:
- Sidekiq
- Resque
- DelayedJob
- Elasticbeanstalk Worker Tier
- RabbitMQ
- and so on…
And setup 2 different clusters, one for the web front-end and another for the workers, so we can scale up the amount of background work we can handle.
But since the beginning, our team knew that we should do this in Go because during the discussion phases we saw this could be potentially a very large traffic system. I have been using Go for about 2 years or so, and we had developed a few systems here at work but none that would get this amount of load.
We started by creating a few structures to define the web request payload that we would be receiving through the POST calls, and a method to upload it into our S3 bucket.
type PayloadCollection struct {
	WindowsVersion  string    `json:"version"`
	Token           string    `json:"token"`
	Payloads        []Payload `json:"data"`
}

type Payload struct {
    // [redacted]
}

func (p *Payload) UploadToS3() error {
    // the storageFolder method ensures that there are no name collision in
    // case we get same timestamp in the key name
    storage_path := fmt.Sprintf("%v/%v", p.storageFolder, time.Now().UnixNano())

	bucket := S3Bucket

	b := new(bytes.Buffer)
	encodeErr := json.NewEncoder(b).Encode(payload)
	if encodeErr != nil {
		return encodeErr
	}

    // Everything we post to the S3 bucket should be marked 'private'
    var acl = s3.Private
	var contentType = "application/octet-stream"

	return bucket.PutReader(storage_path, b, int64(b.Len()), contentType, acl, s3.Options{})
}
Naive approach to Go routines
Initially we took a very naive implementation of the POST handler, just trying to parallelize the job processing into a simple goroutine:
func payloadHandler(w http.ResponseWriter, r *http.Request) {

    if r.Method != "POST" {
		w.WriteHeader(http.StatusMethodNotAllowed)
		return
	}

    // Read the body into a string for json decoding
	var content = &PayloadCollection{}
	err := json.NewDecoder(io.LimitReader(r.Body, MaxLength)).Decode(&content)
    if err != nil {
		w.Header().Set("Content-Type", "application/json; charset=UTF-8")
		w.WriteHeader(http.StatusBadRequest)
		return
	}

    // Go through each payload and queue items individually to be posted to S3
    for _, payload := range content.Payloads {
        go payload.UploadToS3()   // <----- DON'T DO THIS
    }

    w.WriteHeader(http.StatusOK)
}
For moderate loads, this could work for the majority of people, but this quickly proved to not work very well at a large scale. We were expecting a lot of requests but not in the order of magnitude we started seeing when we deployed the first version to production. We completely understimated the amount of traffic.
The approach above is bad in several different ways. There is no way to control how many go routines we are spawning. And since we were getting 1 million POST requests per minute of course this code crashed and burned very quickly.
Trying again
We needed to find a different way. Since the beginning we started discussing how we needed to keep the lifetime of the request handler very short and spawn processing in the background. Of course, this is what you must do in the Ruby on Rails world, otherwise you will block all the available worker web processors, whether you are using puma, unicorn, passenger (Let’s not get into the JRuby discussion please). Then we would have needed to leverage common solutions to do this, such as Resque, Sidekiq, SQS, etc. The list goes on since there are many ways of achieving this.
So the second iteration was to create a buffered channel where we could queue up some jobs and upload them to S3, and since we could control the maximum number of items in our queue and we had plenty of RAM to queue up jobs in memory, we thought it would be okay to just buffer jobs in the channel queue.
var Queue chan Payload

func init() {
    Queue = make(chan Payload, MAX_QUEUE)
}

func payloadHandler(w http.ResponseWriter, r *http.Request) {
    ...
    // Go through each payload and queue items individually to be posted to S3
    for _, payload := range content.Payloads {
        Queue <- payload
    }
    ...
}
And then to actually dequeue jobs and process them, we were using something similar to this:
func StartProcessor() {
    for {
        select {
        case job := <-Queue:
            job.payload.UploadToS3()  // <-- STILL NOT GOOD
        }
    }
}
To be honest, I have no idea what we were thinking. This must have been a late night full of Red-Bulls. This approach didn’t buy us anything, we have traded flawed concurrency with a buffered queue that was simply postponing the problem. Our synchronous processor was only uploading one payload at a time to S3, and since the rate of incoming requests were much larger than the ability of the single processor to upload to S3, our buffered channel was quickly reaching its limit and blocking the request handler ability to queue more items.
We were simply avoiding the problem and started a count-down to the death of our system eventually. Our latency rates kept increasing in a constant rate minutes after we deployed this flawed version.
The Better Solution
We have decided to utilize a common pattern when using Go channels, in order to create a 2-tier channel system, one for queuing jobs and another to control how many workers operate on the JobQueue concurrently.
The idea was to parallelize the uploads to S3 to a somewhat sustainable rate, one that would not cripple the machine nor start generating connections errors from S3. So we have opted for creating a Job/Worker pattern. For those that are familiar with Java, C#, etc, think about this as the Golang way of implementing a Worker Thread-Pool utilizing channels instead.
var (
	MaxWorker = os.Getenv("MAX_WORKERS")
	MaxQueue  = os.Getenv("MAX_QUEUE")
)

// Job represents the job to be run
type Job struct {
	Payload Payload
}

// A buffered channel that we can send work requests on.
var JobQueue chan Job

// Worker represents the worker that executes the job
type Worker struct {
	WorkerPool  chan chan Job
	JobChannel  chan Job
	quit    	chan bool
}

func NewWorker(workerPool chan chan Job) Worker {
	return Worker{
		WorkerPool: workerPool,
		JobChannel: make(chan Job),
		quit:       make(chan bool)}
}

// Start method starts the run loop for the worker, listening for a quit channel in
// case we need to stop it
func (w Worker) Start() {
	go func() {
		for {
			// register the current worker into the worker queue.
			w.WorkerPool <- w.JobChannel

			select {
			case job := <-w.JobChannel:
				// we have received a work request.
				if err := job.Payload.UploadToS3(); err != nil {
					log.Errorf("Error uploading to S3: %s", err.Error())
				}

			case <-w.quit:
				// we have received a signal to stop
				return
			}
		}
	}()
}

// Stop signals the worker to stop listening for work requests.
func (w Worker) Stop() {
	go func() {
		w.quit <- true
	}()
}
We have modified our Web request handler to create an instance of Job struct with the payload and send into the JobQueue channel for the workers to pickup.
func payloadHandler(w http.ResponseWriter, r *http.Request) {

    if r.Method != "POST" {
		w.WriteHeader(http.StatusMethodNotAllowed)
		return
	}

    // Read the body into a string for json decoding
	var content = &PayloadCollection{}
	err := json.NewDecoder(io.LimitReader(r.Body, MaxLength)).Decode(&content)
    if err != nil {
		w.Header().Set("Content-Type", "application/json; charset=UTF-8")
		w.WriteHeader(http.StatusBadRequest)
		return
	}

    // Go through each payload and queue items individually to be posted to S3
    for _, payload := range content.Payloads {

        // let's create a job with the payload
        work := Job{Payload: payload}

        // Push the work onto the queue.
        JobQueue <- work
    }

    w.WriteHeader(http.StatusOK)
}
During our web server initialization we create a Dispatcher and call Run() to create the pool of workers and to start listening for jobs that would appear in the JobQueue.
dispatcher := NewDispatcher(MaxWorker)
dispatcher.Run()
Below is the code for our dispatcher implementation:
type Dispatcher struct {
	// A pool of workers channels that are registered with the dispatcher
	WorkerPool chan chan Job
}

func NewDispatcher(maxWorkers int) *Dispatcher {
	pool := make(chan chan Job, maxWorkers)
	return &Dispatcher{WorkerPool: pool}
}

func (d *Dispatcher) Run() {
    // starting n number of workers
	for i := 0; i < d.maxWorkers; i++ {
		worker := NewWorker(d.pool)
		worker.Start()
	}

	go d.dispatch()
}

func (d *Dispatcher) dispatch() {
	for {
		select {
		case job := <-JobQueue:
			// a job request has been received
			go func(job Job) {
				// try to obtain a worker job channel that is available.
				// this will block until a worker is idle
				jobChannel := <-d.WorkerPool

				// dispatch the job to the worker job channel
				jobChannel <- job
			}(job)
		}
	}
}
Note that we provide the number of maximum workers to be instantiated and be added to our pool of workers. Since we have utilized Amazon Elasticbeanstalk for this project with a dockerized Go environment, and we always try to follow the 12-factor methodology to configure our systems in production, we read these values from environment variables. That way we could control how many workers and the maximum size of the Job Queue, so we can quickly tweak these values without requiring re-deployment of the cluster.
var (
	MaxWorker = os.Getenv("MAX_WORKERS")
	MaxQueue  = os.Getenv("MAX_QUEUE")
)
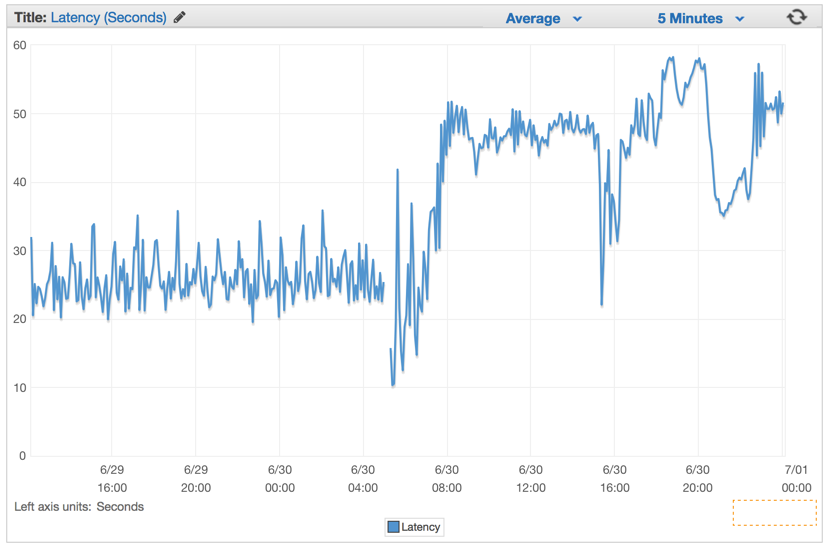
Immediately after we have deployed it we saw all of our latency rates drop to insignificant numbers and our ability to handle requests surged drastically.
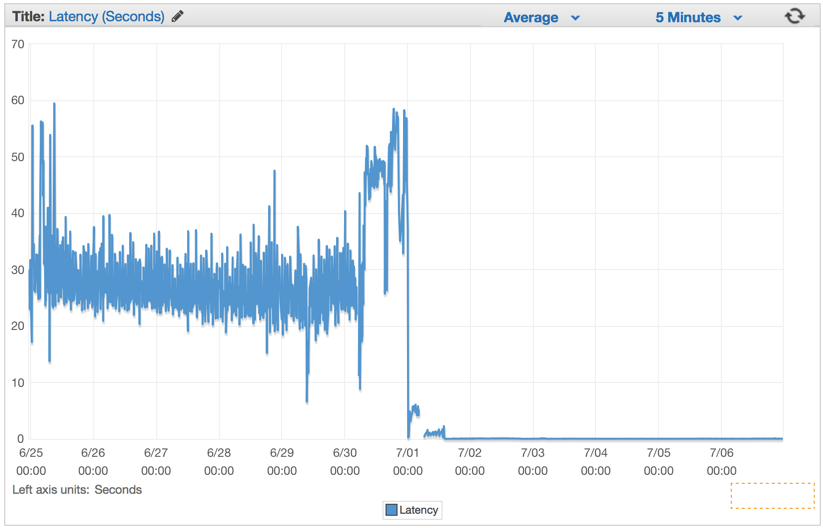
Minutes after our Elastic Load Balancers were fully warmed up, we saw our ElasticBeanstalk application serving close to 1 million requests per minute. We usually have a few hours during the morning hours in which our traffic spikes over to more than a million per minute.
As soon as we have deployed the new code, the number of servers dropped considerably from 100 servers to about 20 servers.
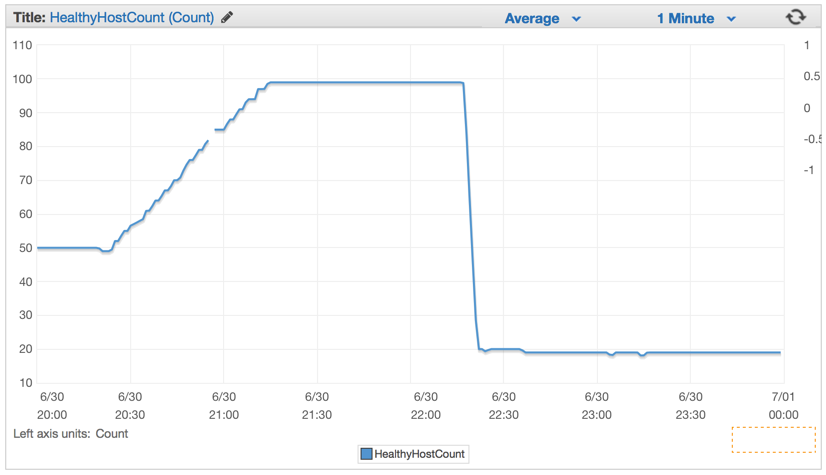
After we had properly configured our cluster and the auto-scaling settings, we were able to lower it even more to only 4x EC2 c4.Large instances and the Elastic Auto-Scaling set to spawn a new instance if CPU goes above 90% for 5 minutes straight.

Conclusion
Simplicity always wins in my book. We could have designed a complex system with many queues, background workers, complex deployments, but instead we decided to leverage the power of Elasticbeanstalk auto-scaling and the efficiency and simple approach to concurrency that Golang provides us out of the box.
It’s not everyday that you have a cluster of only 4 machines, that are probably much less powerful than my current MacBook Pro, handling POST requests writing to an Amazon S3 bucket 1 million times every minute.
There is always the right tool for the job. For sometimes when your Ruby on Rails system needs a very powerful web handler, think a little outside of the ruby eco-system for simpler yet more powerful alternative solutions.
Jul 6, 2015
For years I have been thinking about creating a spot where I can post articles about programming and technology in general. But every attempt to do so have result in complete failure, mostly due to the hassle of setting up maintaining a blog that can be easily updated. I’ve never been a fan of Wordpress and have experimented with other solutions like Octopress and Jekyll, but none of them felt right to me.
Until I have recently discovered Hugo. It’s really awesome and easiy to setup, I can use Markdown to simply create new posts and share my world.
Check it out at:
http://gohugo.io
Let’s see if I can keep up with this from now on. Definitely the barrier that was holding me back is gone.
Cheers,
Marcio